
Valentine's Wishlist: For Her

It's no secret that I love Valentine's Day.
To me, it's more about candy, fun, and friends than it is romance — but I don't mind a little bit of that, either. It's the perfect excuse to gorge on a box of chocolates or Necco hearts—whether it be out of love or hate. Valentine's Day also celebrates one of the brightest, happiest color palettes, so I'll admit that a lot of these gift picks were chosen for their saturation (but also their amazingness)!
I realize that most of these things are super girly, but never fear — I have an equally manly wishlist coming later this week.
I'd love to hear how you celebrate your love (or hate) for V- day. What are your plans this year?
DIY: Elastic Hair Ties
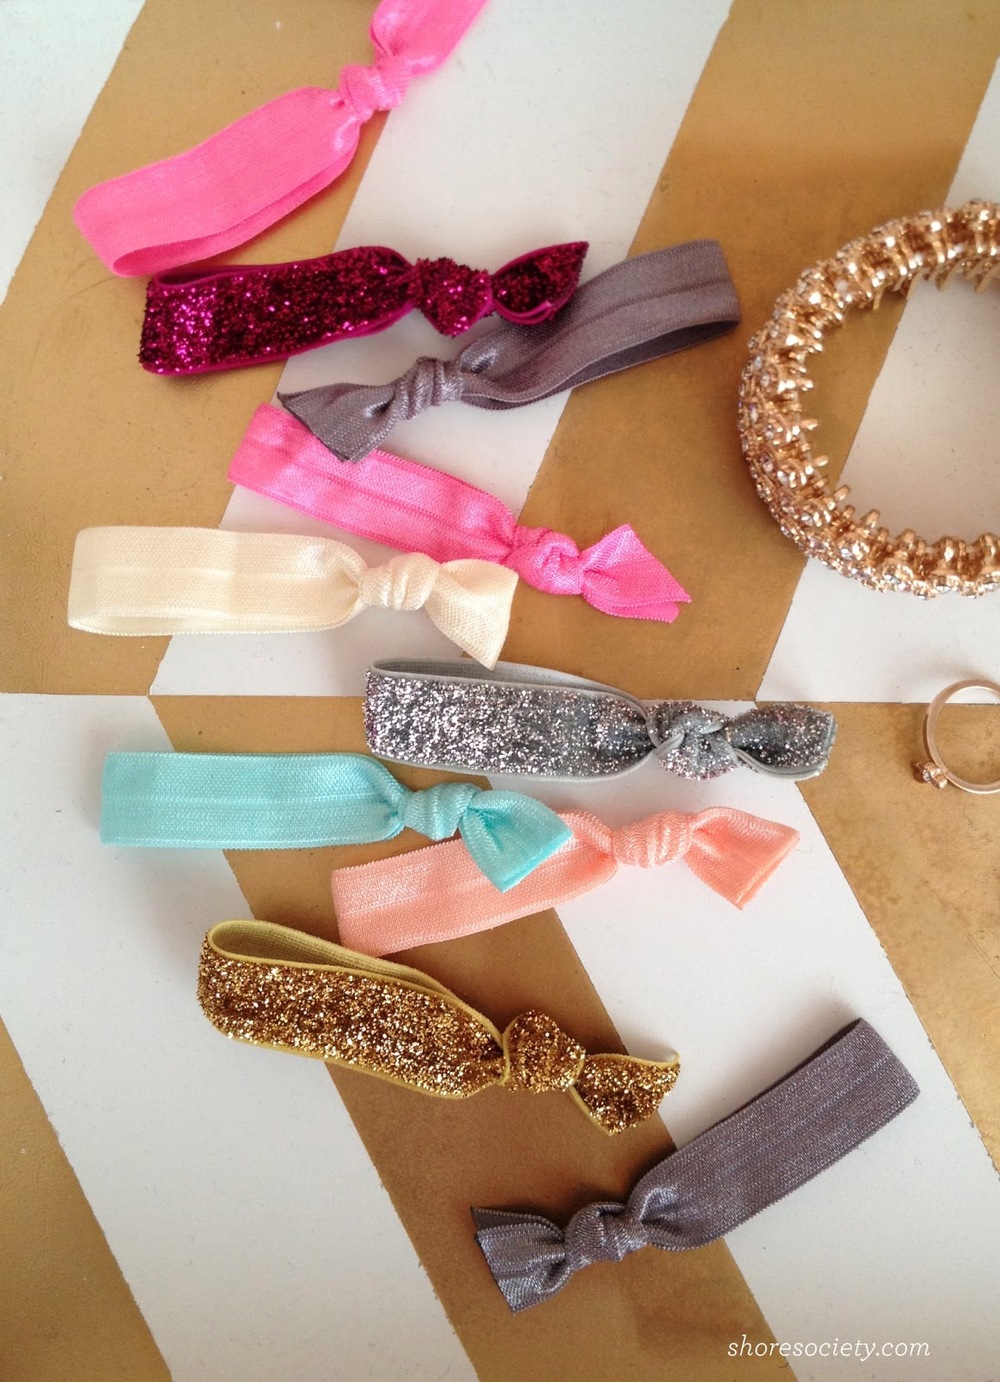
I was this close to buying a set of hair elastics from Anthropologie a while back, but stopped short after I saw the price tag. $12 for only FIVE? Yikes! I put them back, thinking I could find them cheaper elsewhere, until I found a couple of tutorials online and decided to make them myself.
This was ridiculously easy, and I was able to make about 45 hair ties for only $11 (take that, Anthropologie).
YOU'LL NEED:
Foldover elastic in 5/8" size - as many yards and whatever colors you'd like. Each yard makes about 4 hair ties. I purchased my elastic here.
Sharp scissors
Lighter
Ruler

Measure and cut a piece of elastic (flat) to 8.25". If you have thicker hair, add another quarter or half inch. Also something to note: the glitter elastics seem to be less stretchy than the solids, so I added a half inch to those. Otherwise, they wouldn't fit on my wrist!

Tie ends in a knot, leaving about half-inch sized tails, and trim ends together at an angle.

Using a lighter, you'll seal the ends to keep them from fraying. Hold the flame close to the ends, without touching them. You'll see the fibers melt a little, creating a finished edge.

And you're done! This is an easy, mindless thing to do while crushing through episodes of Homeland (obsessed with that show) or whatever you please :) I love these ties because they don't leave a big crease in your hair, and they look cuter on your wrist for those emergency ponytails. Hopefully this saves you a couple bucks, too, because I know I won't ever be buying these!
Holiday Snaps


Adieu, 2012

2012, you were truly wonderful. Usually I am ready to leave the old year behind and start a new, but the truth is, this year was great to me, and to my family.
We spent a lot of the year stressed and overwhelmed with the process of buying our house, but once we cinched the deal in July, we were able to enjoy what we'd been waiting for. We also celebrated my mom's wedding, my promotion, I spoke at WMC Fest among amazing company, and left our apartment behind for a new chapter. It was a wild ride, but it will be a tough act to follow.
I'm never one for resolutions, but I'm hoping to bring many more DIY projects, design posts, and a daily feature to the blog this year. Stay tuned tomorrow for details — and happy celebrating!
DIY: Bold Striped Curtains

As I mentioned in my DIY Ombre Curtains post — window coverings can get pretty pricey. What's even more frustrating is when you just can't find what you want out there in the market. I had a vision for striped curtains, but they had to be BOLD — the bigger the stripes, the better.
I couldn't find them anywhere, until my old friend Pinterest led me to this post with instructions on how to make exactly what I wanted.
This was strikingly easy, but took some time. I also made four panels, since we used these on our living room window and our dining room window. They are the two windows in the front of the house, and we felt they had to match.
What you'll need to make 2 curtains (for one window):
2 cream grommet curtain panels (mine were from Pottery Barn)
5 yards black cotton twill fabric
4+ rolls of Stitch Witchery or other fusible web adhesive
4+ spools of 3/8" black grosgrain ribbon
Iron
White pencil or chalk
Rotary cutter or fabric scissors

Start by cutting your strips of black fabric. Depending on the size of your drapes, you'll want to do some math to figure out how long the stripes need to be. Mine were 84" long, and I wanted 4 black stripes, so I subtracted the grommet tab from the total length, then divided that by 7 (total stripes).
Phew - this is boggling my math-inept brain. Each stripe ended up being 11".
The length will be the same for all of the stripes except for the bottom one — it will have to be a couple inches longer, so it can be folded under for a finished look. For the rest, you will just leave the edges raw.
As for the width, you'll want to add at least an inch on each side, so they can also be folded around and secured on the back of the panel.

Disclaimer: this is our fugly attic carpet. But hey...we have a finished attic at least, right?
Lay your curtain panel out and place your stripes down, measure the spaces to make sure they're even, and get to ironing. Use a strip of Stitch Witchery at the edges of each stripe, and iron carefully to adhere the stripes to the panel. Don't worry about folding the raw edges over to create a seam - you'll just cover the raw edge with grosgrain ribbon, also attached with the Stitch Witchery.
Once you're finished attaching the stripes and ribbon, flip the panel to the other side, and fold extra stripe fabric over and secure with more iron-on adhesive. Also do this with the ribbon - it will give you a seamless, finished edge.

Here's a good shot of how the edges should look.

Repeat for the second panel, and you're done! Each panel took me about two hours, but by the time I was on my fourth I flew through it. I'm so happy with the process and how bold they look in our house. Our dining room totally pops, and the stripes also compliment the cozy neutral scheme we have in our living room. They work perfectly in both spaces.
Now that I've got a whole bag full of Stitch Witchery, I'm looking for more projects like this. If you have any ideas, send them my way!
Holiday Weekend with Stella & Dot

It was hard to choose which things to snatch up, but I ended up with a big gold statement necklace that had my name all over it.


DIY: Nautical Rope Mirror

When I first saw this mirror DIY, I knew we had to make it for our master bedroom. We have a subtle nautical look in the bedroom (no boats or lighthouses, thank you very much). It was an IKEA hack inspired by a Restoration Hardware mirror, and cost us under $50 to make. Win!
To make it, all you'll need is:
A non-active doorknob (one without the working/locking parts)
Two screw-in large metal eyelets
6 feet of large rope (available by the foot at Home Depot)
A couple of screws + a drill
Fishing wire or strong thread
The interesting thing about this mirror (and the original Restoration Hardware one) is that it doesn't actually hang on the rope. There's no tension there. So, you will start by hanging the mirror on the wall as you normally would - leaving room for the rope and doorknob fixture at the top.
After you hang the mirror, screw the eyelets into the wall. You can measure up from the floor to make sure they're even on both sides. You will probably need to drill some starter holes in the wall since the eyelets are pretty thick.
Now, you'll attach the doorknob to the wall with screws (there should be holes on the plate of the doorknob). You can mount it as high as you'd like - I believe ours was about a foot and a half above the top of the mirror.
Finally, thread the rope through one of the eyelets and finish it with a stop-knot. Loop it up over the knob, and down through the next eyelet, tying with another knot. Trim the ends of the rope and loop some fishing wire around the ends to stop the rope from unraveling.
And that's it! It was an easy DIY that added something really unique to our room. Mirrors can be expensive, so I'm really happy we were able to make something budget-friendly that ended up being better than anything we could have bought!
Nesting Snapshots

Things are coming together little by little - and it's the greatest weather to be inside, putting things out and getting organized. Our new doormat is one of my favorite things we've gotten, as well as this porcelain pineapple that makes me smile.
We're going to be getting rain this weekend, but hopefully it won't stop us from carving pumpkins and getting ready for Halloween. It really snuck up on us this year — it's my favorite time of year and I hope we can slow down for a minute and enjoy it. Are you decorating for Halloween? Baking pumpkin seeds? Dressing up?
House Renovation: Week 2
...And I'm back for week two! This week saw a lot of cosmetic progress, although it was slow because the work on the floors prevented us from doing everything we wanted. The bedrooms got painted (bedroom 3, the office, is still not pictured - it was full of our junk because the floors weren't being done in there).

This is the dining room...

The first coat of oil went down, and looked bea-utiful!

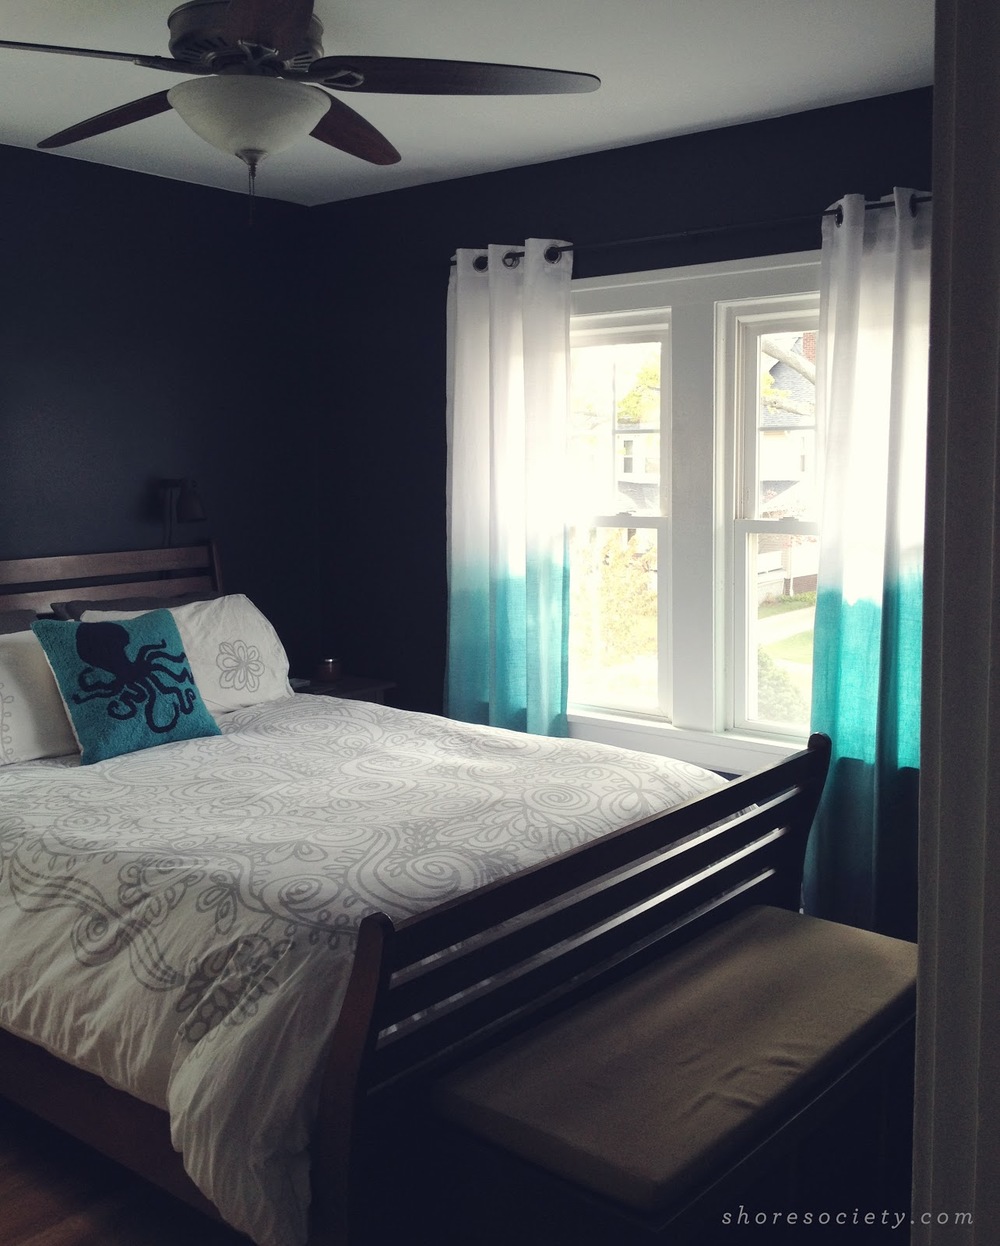
Here's the master, with the floors done, walls painted, and ceiling fan from the guest room switched into this room. You can see a bit more of the design of the master in my previous post, with the ombre curtains - so I'm backtracking a little.

The guest room — pretty peach with a drum shade semi-flush mount. Neither one of us is crazy about ceiling fans, but this one suited the master so we decided to put it in there. With all of the other lighting we had to buy (we replaced everything - hallway lights, landings...) it wasn't such a bad thing to repurpose something for now!

This was favorably known as the "Linen Closet Excavation of 2012." Our new linen closet is so perfect, it makes me smile every time I open it. Going through all of our stuff and reorganizing it took an entire afternoon — but now it's so neat and tidy, it was worth it. We'll see how long it stays that way!
That's all I have to share for now, we're finally unpacked and the rooms are almost fully decorated, so the true "afters" are still to come. We just made this amazing rope mirror for the bedroom, so I'll be posting that DIY next. See you soon!
DIY: Ombre Curtains

When it came to buying things for the house, curtains were the one thing that I was excited to look at, but not excited to buy. Have you bought curtains lately? They are so unbelievably expensive (at least the ones I wanted were) and you never need just one panel. That's where things get crazy — you start counting the windows in your house, ca-ching ca-ching!
Next thing you know, you're spending a grand on fabric that hangs from your windows.
After I convinced myself that buying those Anthropologie curtains would be totally insane, I thought about making a DIY version of them. When I realized the ruffles might just be a little too much, I decided to keep with the idea of hand-dying, but go with something a little simpler.
This was a very easy DIY, but it took some time to get the hang of it. You'll have to set up your work are to suit your space — I've read that you can do this outside with a clothesline, or if you have somewhere else to drape/pin up the curtains to dry, that works too. This is definitely a bit on the messy side, so be sure to wear your paint clothes just in case, and put a tarp down.
YOU'LL NEED:
2 white curtain panels (mine are from Target)
2 bottles of liquid RIT dye in teal (or color of your choice, for the
main
part of the ombre)
1 bottle of liquid RIT dye in royal blue (this is for the bottom dipped piece)
Bucket
Pair of rubber gloves
Nearby sink or hose
Clothesline + Pins
Tarp
Pen
Beer! (duh)

DIRECTIONS:
You will dye the panels one at a time, so I'll walk you through one, then you just repeat!
1) Measure + mark
: The bottom half of the curtain will be the ombre part, and the top will remain white. So first, fold each panel in half and make a light pen mark on the back side of the panel, along the edge. These marks will help tell you where to stop when you're pulling each section out of the dye. This halfway mark is where you will dip to when you begin. Then, measure that bottom half into thirds and mark those sections. These will make the ombre gradation easier for you to plan — if you want to wing it, go for it! I found that there were plenty of other "happy accidents" that occurred, so I'm glad I at least measured and got the sections to be somewhat even. You still get a natural look with measuring.
2)
Rinse + Dip: Rinse each curtain in warm water before beginning. You want them damp, not wet, so squeeze out excess water. Fill a bucket with the hottest water you can, and add one third of one bottle of teal dye. With a gloved hand, swish the dye around in the water to mix it. Next, dip the curtain into the bucket and stop at the halfway mark. Let this section soak for 5 minutes.
After 5 minutes, add another third of the bottle of teal dye to the water, careful to not pour directly onto the curtain. Again, swish the dye around to mix. Pull the curtain out to the next pen mark. Let this part sit for 10 minutes.
For the next section, add the remaining dye (last third) in the bottle and pull the curtain out to the bottom third. At this point, you might need to pin up the curtain so it's not laying on the floor. Set a timer for 10 minutes.
Now that the curtains have been dyed in teal ombre (and hopefully looking really cool) you're going to rinse them (I believe in cold water, check the instructions on the dye). A lot of dye is going to rinse off, so don't freak out, it won't come off the curtain :) They will lighten up slightly, so take that into consideration with your dipping times and adjust depending on the look you want.
Gently give them a squeeze to get excess water out, then hang them to dry slightly. This was when I moved on to the next panels (I did three), so now you can repeat. Dump out your bucket and start fresh for each panel.
3) Dip the bottom: After all the panels were dyed teal, it was time to dip them in a darker color just to add that extra bit of gradation. In a bucket of hot water, add half the bottle of royal blue dye. Hang the curtain and dip just the very bottom in the bucket. I didn't measure this, just eyeballed it. Let this soak for 10 minutes. Repeat this for the second panel, with a fresh bucket and the remaining half of the dye.
4) Rinse + hang: Rinse the bottom portion that you just dyed, and hang these puppies up to dry! A little tip for hanging - make sure if you have to fold the curtains over the clothesline (if they're too long to just pin) don't let the white portion touch the dyed areas at all. The littlest bit of wet dye will leave spots. If you do get a spot on the white, you can spot treat them with bleach right away.
Let them dry overnight, then you're ready to go!
They look so airy and beachy, and beautiful when the light comes through. I couldn't be happier with this DIY — it's budget friendly and totally customizable. You can make as many curtains as you want, in whatever colors you want.

I also kind of want to dye everything now — have you ever dyed anything for fun? Aside from those tie-dye tees we made in the 90s?
I was so encouraged by making these, that I decided to make my own bold striped curtains for the living and dining rooms. That one doesn't involve dye, but it's equally as easy. I'll be sharing that DIY shortly, so check back!