

Shore Society for Sapphire Pear

The ladies of Sapphire Pear and I recently linked up to create a range of products, and I'm so excited for the launch! I designed a variety of tea towels and coaster sets just for them, that will be perfect for sprucing up your kitchen or bar cart.
Their shop and studio in Rocky River is full of tantalizing color combinations and furnishings, and I was really inspired by their space when I began designing. There are a range of hand-drawn patterns, which of course had to include some nautical subjects. We worked together to develop the color palette, which reflects their punchy design aesthetic.
All of the pieces are available exclusively at Sapphire Pear, so be sure to stop in or give the ladies a call to get your own!


Spring Greenery, Five Ways
It feels official after that beautiful Easter weather – spring is on its way! I've spotted a few buds popping up in my garden, but am all too anxious to start seeing green. Luckily, I've teamed up with the lovely Bronwen from Twig Florals to show you some creative and accessible ways to bring greenery into your home this spring (or year-round)! We had a fun day shooting with Lauren Gabrielle Photography, and I was thrilled to collaborate with Bronwen again, who was the talent behind our wedding florals.
Many of the greens featured here can be found at a garden center or grocery store (think Trader Joe's, Whole Foods, or Heinen's). We'd also recommend calling your local florist – they are usually willing to order anything specific you might need. Just be sure to ask about minimum order quantities, since they are likely working with a wholesale supplier. Continue reading below to learn about the varieties we used, and see how to spruce up your home for spring!


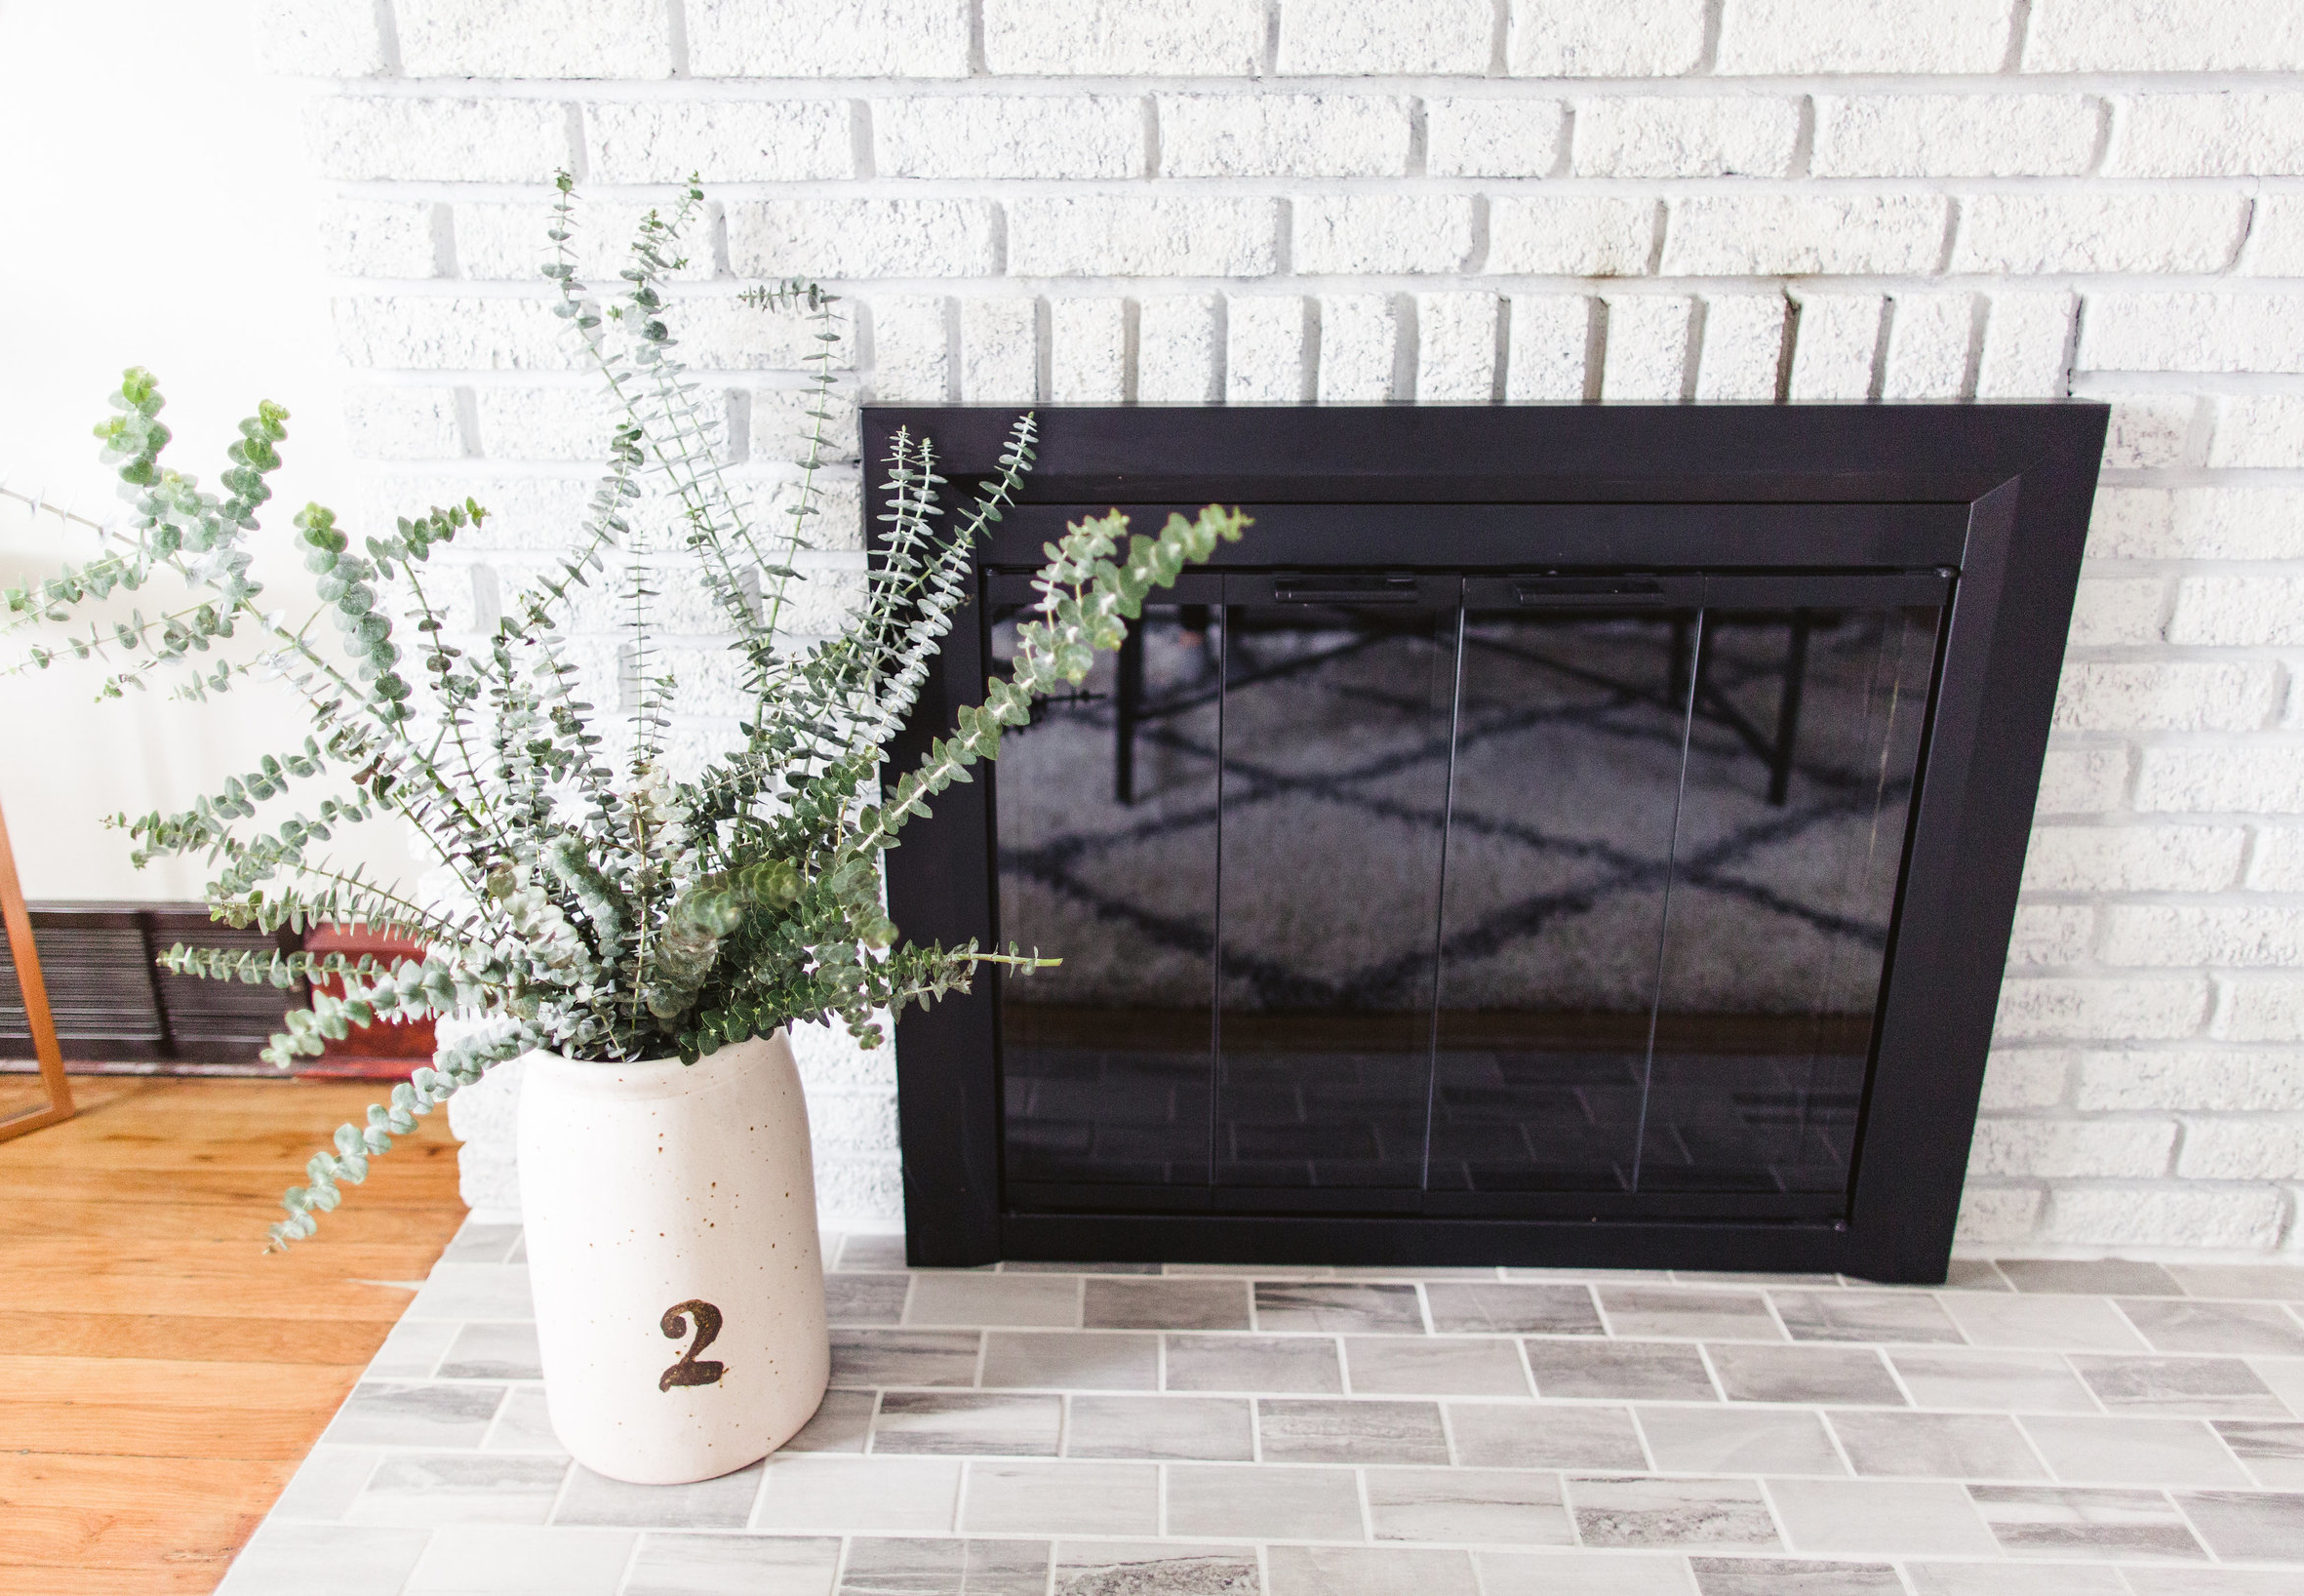
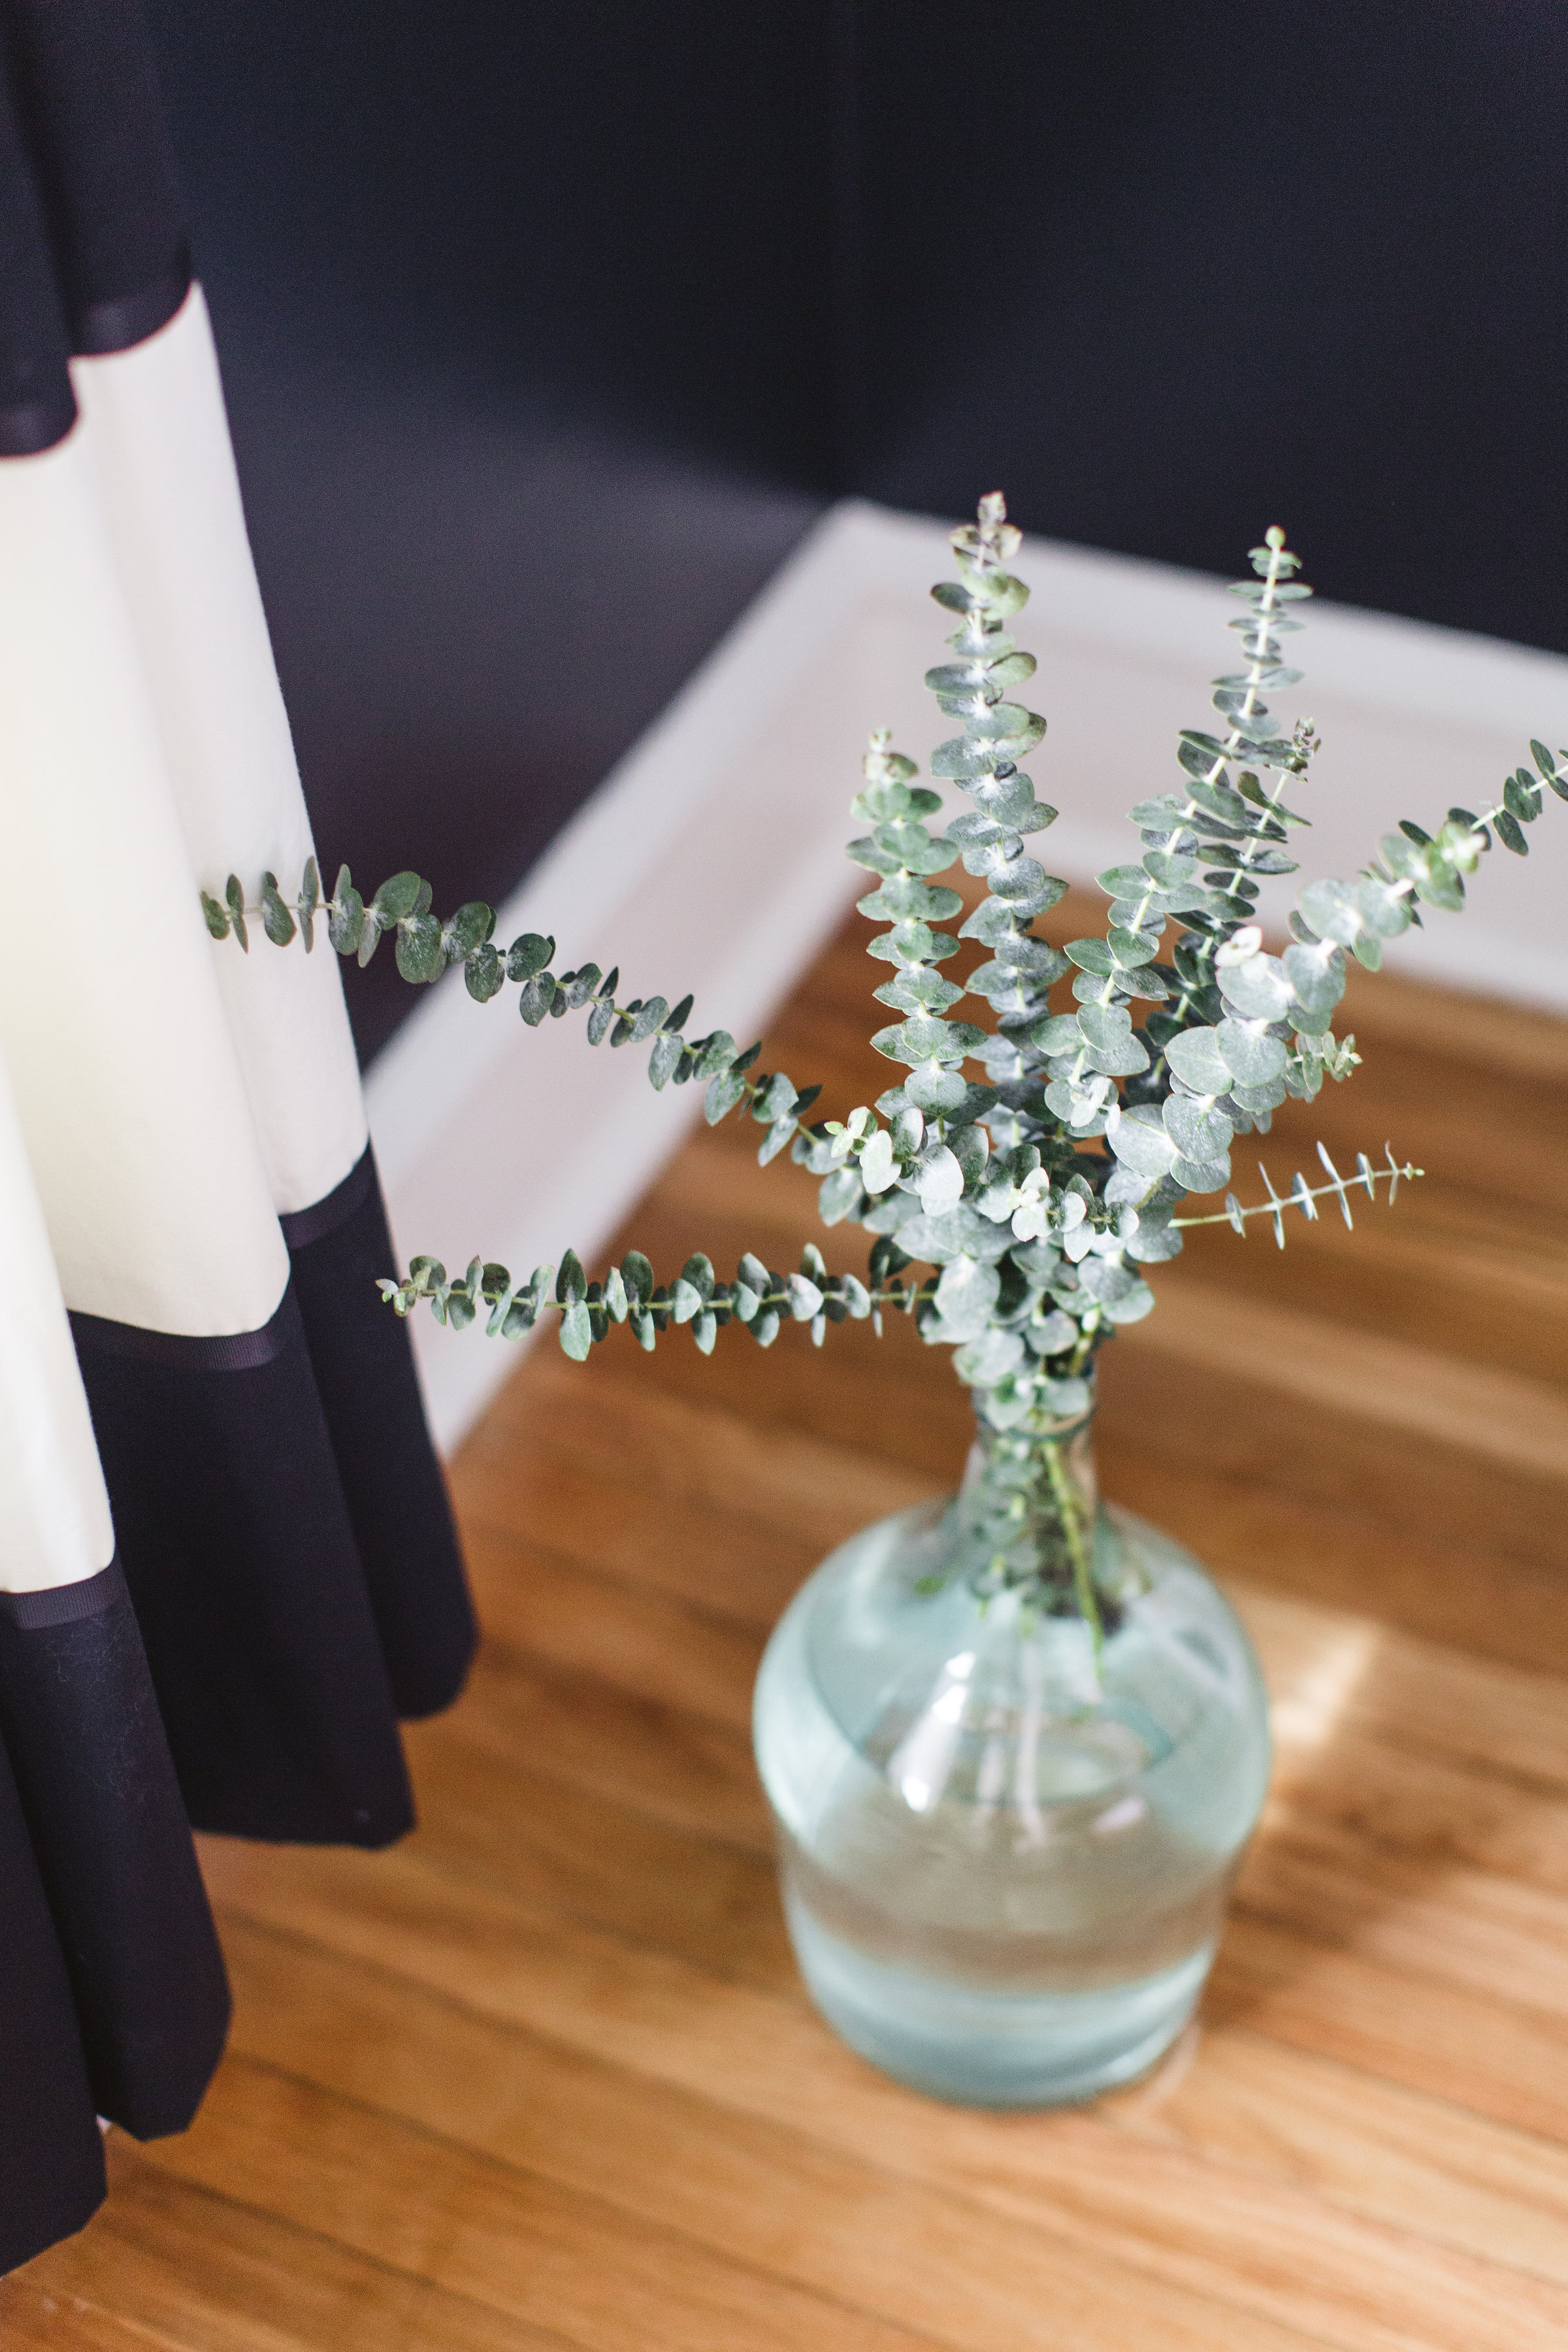
Greens Used: Baby Blue Eucalyptus
Blue eucalyptus can be so impactful – it smells amazing, and its silvery blue leaves add a striking focal point to any color palette. I usually place a sprig or two in bud vases, but loved Bronwen's suggestion to fill a large vessel with a bunch of stems. Here, we used a terra cotta crock and an oversized blue bottle, but you could also recreate the look in a galvanized metal vase or bucket. The look is very easy to accomplish – fill your vessel with water, and place your stems in, a few at a time. Arrange the taller stems toward the middle, with shorter stems along the sides.


Greens Used: Rosemary, Tree Fern
For the freshest greens, look no further than your own backyard! Bronwen suggests exploring your yard or neighborhood for vines, fresh-cut sprigs from bushes, or even herbs from your garden to add to small bud vases or bottles. Rosemary, mint, thyme, or lavender make beautiful and aromatic additions to small spaces or shelves. These would look charming in a kitchen, on a bar cart, or on a side table in a guest room. Don't have an herb garden? Hit up your grocery store for pre-packaged stems in the produce section.


Greens Used: Ruscus Vine, Green Hydrangea, White Aster
This wall arrangement would make a beautiful statement for a party, a shower, or seasonal brunch. Here, we used a "K" as a monogram design, which would be super cute to represent a bride's new last name, or a baby's initial for a baby shower. You could also arrange the greens in a shape instead of a letter – a heart or circular wreath would work nicely. This makes a statement no matter where you hang it – we chose to place it over a mantle, but you could also arrange this over a bar cart or table setup for a party.


Completing this arrangement takes a bit of time and finesse, but it's not overly advanced. We recommend starting with a sketch, then translating that to the wall.
Cut the vine into sections to make up the limbs of the letter (the sizes will depend on how large you're making it). Attach each vine to the wall using masking tape, securing where needed. Try to hide the tape if you can, or choose a tape that matches your wall color. Once your vines are in place, you can add bits of florals to enhance the monogram. Here, we used small snips of green hydrangea and white aster (which look like mini daisies) to complete the spring look. Attach them to the vines using tiny bits of tape.
If you can't get your hands on ruscus vine, you could likely forage some English ivy from your neighborhood (you know, the vines that grow like crazy over fences, walls, basically anywhere you don't want it)! Green hydrangeas always seem to be available at Heinen's (for the local readers) and you could probably find the white aster there as well.


Greens Used: Sword Fern, Tree Fern
For a more everyday look, use a collection of mini bottles to create a statement in numbers. These are easy to find at craft stores or thrift shops, and look great when arranged with a variety of other colors, shapes, and sizes. Here, we filled them with a mix of sword fern and tree ivy – the contrast of the whispy tree ivy and the strong, straight nature of the sword fern makes for an interesting pairing. Sticking with only 2-3 types of greenery will also keep the look from getting too busy. Arrange them on a console table as shown, or line them up on a dining table for an interesting centerpiece.


Greens Used: Seeded Eucalyptus, Rosemary
This is another super simple (yet super beautiful) way to spruce up your dining table for a spring brunch or a romantic dinner at home. To create this look, you'll want to start with approximately 10-12 stems of seeded eucalyptus. You can usually find seeded eucalyptus at a premium grocery store, but I've also been able to get it through a local florist.
Using scissors or pruning shears, trim off the thick portion of each stem, leaving only the more delicate main stem that the leaves and seeds are attached to. Starting from one end of the table, place one stem after another, overlapping them to create fullness. Fluff and arrange the leaves as needed to fill in any gaps or to hide the stems of the other pieces. And that's it!


You can enhance the look by introducing some greenery in your place setting – here, we simply tucked a sprig of fresh rosemary into the napkin ring.


Another way to enhance the "green" of your table setting is to include them in in edible form! We loved the added sprigs of mint on the cakes – it looks so fresh and ties the greenery element into the desserts. These stunning bundt cakes were made by Salt + Honey Baking Co. and tasted as luxurious as they looked. We were certainly not complaining about eating the props ;)
Bronwen and I were excited to share this little dose of DIY, just in time for spring. I love to bring the outdoors in, and until my garden starts blooming, these are five easy ways to do it (which don't involve the constant care of a houseplant, either)! If you have questions about any of the looks you've seen here, feel free to leave a comment and either Bronwen or I will happily answer them. Huge thank you again to Bronwen, Lauren, and Salt + Honey for making this little collaboration happen. Happy spring to you all!

Library Themed Baby Shower Invites

Happy Monday, everyone! We made it to the other side of Daylight Savings. How awesome is that? I don't even mind losing an hour of sleep when it means that sunnier days are ahead!
We started our massive kitchen remodel this weekend (story for another blog post – coming soon), but today I'm here to share these baby shower invitations I recently finished.
My client wanted something sophisticated and gender neutral to fit her library themed shower, and I'm so happy with how they turned out. We chose not to use any literal "library" iconography, and instead used the format to telegraph the theme. I used a manila pocket to hold the library-card styled invitation, as well as a bookplate label for guests to fill out with a message for baby. The bookplates will then be placed into the books that will fill the little one's library. Such a sweet idea that I'm sure he or she will treasure when they're older!
I also designed a matching Thank You card, making it a fully customized suite. Big congrats to this lovely couple on their baby-to-be!


Everyday Beauty Favorites

Since my last skincare post, I had some requests for another product roundup – so I'm here to share my favorites from my everyday makeup routine. Even on my most basic days, I still take time to do my brows, freshen up my skin, and throw on a nude lip. I tend to mix things up from there, but these products are the ones I reach for consistently and that never disappoint.
My skin is in that in-between area, where I don't want the full-coverage of foundation every day, but I do want more than a tinted moisturizer to even out my tone. This has more coverage than a tinted moisturizer, but still lets your skin show through. Bonus points: it does double-duty as skincare and an anti-aging regimen. This formula is full of peptides, vitamins, and hyaluronic acid to give long-term brightening and firming results. I love multi-tasking so this is money in the bank for me! The shade I use is medium.
2 // MAC Pro Longwear Concealer
I love this concealer for my under-eye area and for the occasional breakout. I get dark circles like woah when I'm tired, and this totally takes care of them. It lasts all day (seriously) and is never cakey like many of the cream-based concealers I've tried.
I don't go into full contour-mode every day, but I do use 1-2 of these in my daily routine – usually one of the bronzers, and then a highlighting shade swept over my cheekbones, forehead, and down the center of my nose. There are a ton of YouTube videos showing how to use this palette to its full potential, so I highly recommend checking them out!
4 // Anastasia Brow Powder Duo
My brows and I have been on a lifelong journey together. They have taken on many forms — from overgrown (au natural) to over-plucked and almost nonexistant (don't give a middle schooler a pair of tweezers without a tutorial). They've finally reached their current state, where I think we've achieved total harmony. I rely on this brow powder to fill in any sparse areas, and then use Anastasia's Dipbrow and brush to shape and contour.
5 // Urban Decay 24/7 Glide-On Eye Pencil
I love these pencils because they last, don't bleed, and come in a variety of awesome colors. I used to stick with black liner (in Perversion), but I also love it in Rockstar, Goldmine and Hustle. Truly...I want the entire crayon box of these liners!
6 // Too Faced Better Than Sex Mascara
I think I've tried every mascara in the book, and this is my hands-down favorite. I don't need to use a lash curler with this, but if I want an extra boost, this is the one I use. My only gripe about this mascara is that it occasionally flakes a bit towards the end of the day. Otherwise, it is my holy grail and I'll never turn back. My previous favorite was Benefit's They're Real! but it just doesn't give me the va-va-voom that this does.
7 // MAC Lipstick in Creme Cup
I have a MAC lipstick problem. The struggle is real. I wear a nude lip most days, and my favorite nude lipsticks include Creme Cup (pictured, a pinky nude) and Creme de Nude (a true nude).
8 // NARS Lipgloss in Turkish Delight
This gloss works perfectly over a nude lipstick, or has face-brightening powers on its own. It's so easy and will always be in my bag!
9 // MAC Mineralize Skinfinish in Soft & Gentle
If I want a little more highlighter than what's in the Anastasia Contour palette, I'll use this, applied with a finger or with a soft fan brush. It's really subtle and not too shimmery, but you can build it for more for a night-out appropriate look.
10 // Make Up Forever HD Powder
I finish everything off with a few presses of this powder in my shinier spots. It's super light, never looks cakey, and gives a smooth, airbrushed look. Definitely my favorite powder that I've tried.
What are some of your favorite products? I am always on the lookout for new things to try!
Our Wedding Film
I could hardly contain my excitement when Jess from JFray Productions told me our wedding film was done. Booking a videographer was something Jim and I debated for weeks, and I can say with 10000% confidence that we made the right choice for us. I loved Jess's work and knew the video would be amazing, and I feel even more relieved seeing the final product and knowing this might not have existed!
The video perfectly captured our day — I can feel the breeze, the sun, the hugs — it takes me back to moments I forgot about in the blur of it all. We'll treasure it always. Enjoy a little peek into our wedding above! You can click "HD" to watch in full quality.

Favorite Holiday Traditions

source: the effortless chic
I'll be the first to admit I used to be a bit of a scrooge when it came to the holidays. Christmas was always fun as a kid, but as life became more complicated, it was less about holiday cheer and more about creating a harmonious schedule of house hopping between parents and families. I'm sure you other divorce kids know what I mean. When I first met Jim, I was still in my jaded "I-hate-Christmas" phase, but making new traditions as a couple has helped to melt my cold, Grinch heart. I also think growing up helps — the cooking, baking, boozing, and family gatherings just seem so much more fun as an adult. I love seeing friends and family visit from out of town, and dare I say, I even enjoy a good snowfall here and there (okay but after January, it's so not cool). I look forward to this time of year now more than ever, and it's mostly because of the way our celebrations have evolved. Here are some of my favorite traditions of the season:
Baking kolaches
My paternal grandma was Czech, and had her own yearly Christmas tradition of baking kolaches, which are an old-world Czech cookie. The dough is a true labor of love – it's a yeasted sour cream dough that takes over a day to rise, and then rolling/cutting/filling the dough with fruit preserves takes its own extra effort. When my grandma became too old to continue baking, my sister and I took over the kolaches to keep our family in full stock. My dad looks forward to these every year, so we can't miss a beat! We usually get together on Christmas Eve and have a beer, roll up our sleeves, and get to work. The whole process takes a few hours, but the reward is ever so sweet — and the process really keeps our grandma's spirit alive. I should also mention that if you're in the Cleveland area and want to try a kolache — call me. I haven't found a bakery around here that comes even close to the goodness of this recipe (and my dad agrees).
The tree (of course)!
After tolerating our old fake tree from our apartment days, Jim and I finally sprung for a new artificial tree that better fits our space. It's a big, glorious fir that's full of lights. I always enjoy decorating our tree, but this year was even more exciting for that reason. It's so much bigger, I had to go out and buy more ornaments to fill it up! However, most of our ornaments were gifts to each other, or represent a vacation, milestone, or joke that we have. I love to open up the box of ornaments and unwrap them, one at a time, and enjoy the memories of when we got it, or what it represents.
The Murray Family Christmas Party (#MFCP)
One of my best friend's families has been hosting a Christmas party for as long as I can remember. They do it up right — killer food with Italian flair, Kevin's oatmeal cookies, overflowing bowls of punch, and the outdoor ice luge brings a new meaning to "vodka on the rocks." Although our group of friends are now spread out across the country, sometimes a few of us are lucky enough to reunite at the party. It's also the place where my mom and stepdad met, 15 years ago, but that's a story for another day ;)
Christmas Eve
Both of our families have annual Christmas Eve gatherings, and no matter which one we go to, I have a great time visiting with our extended families. We are both blessed with lots of wonderful aunts, uncles, grandparents and cousins and I love any excuse to see them. Their parties are always full of holiday appetizers, festive cocktails, hugs and laughs. It sounds incredible cheesy but I truly feel the warmth of the season when we all get together. I enjoy it just as much as Christmas day!
Gifting with Jim
Once all of our family time is finished, Jim and I make time for our Christmas — usually that night, once we're home and settled in. We light a fire, make a cheese board, enjoy a bottle of bubbly and exchange gifts. It's quiet and relaxed and we can take our time without having anywhere else to be. It's the perfect way to end the day.
I would love to know what you guys do for Christmas, or if you have made any new traditions. Every family and culture is different and I think that's what makes the holidays so interesting — it's just about celebrating what's important in whatever way that works for you.

Recipe: Cranberry Gin + Ginger Cocktail
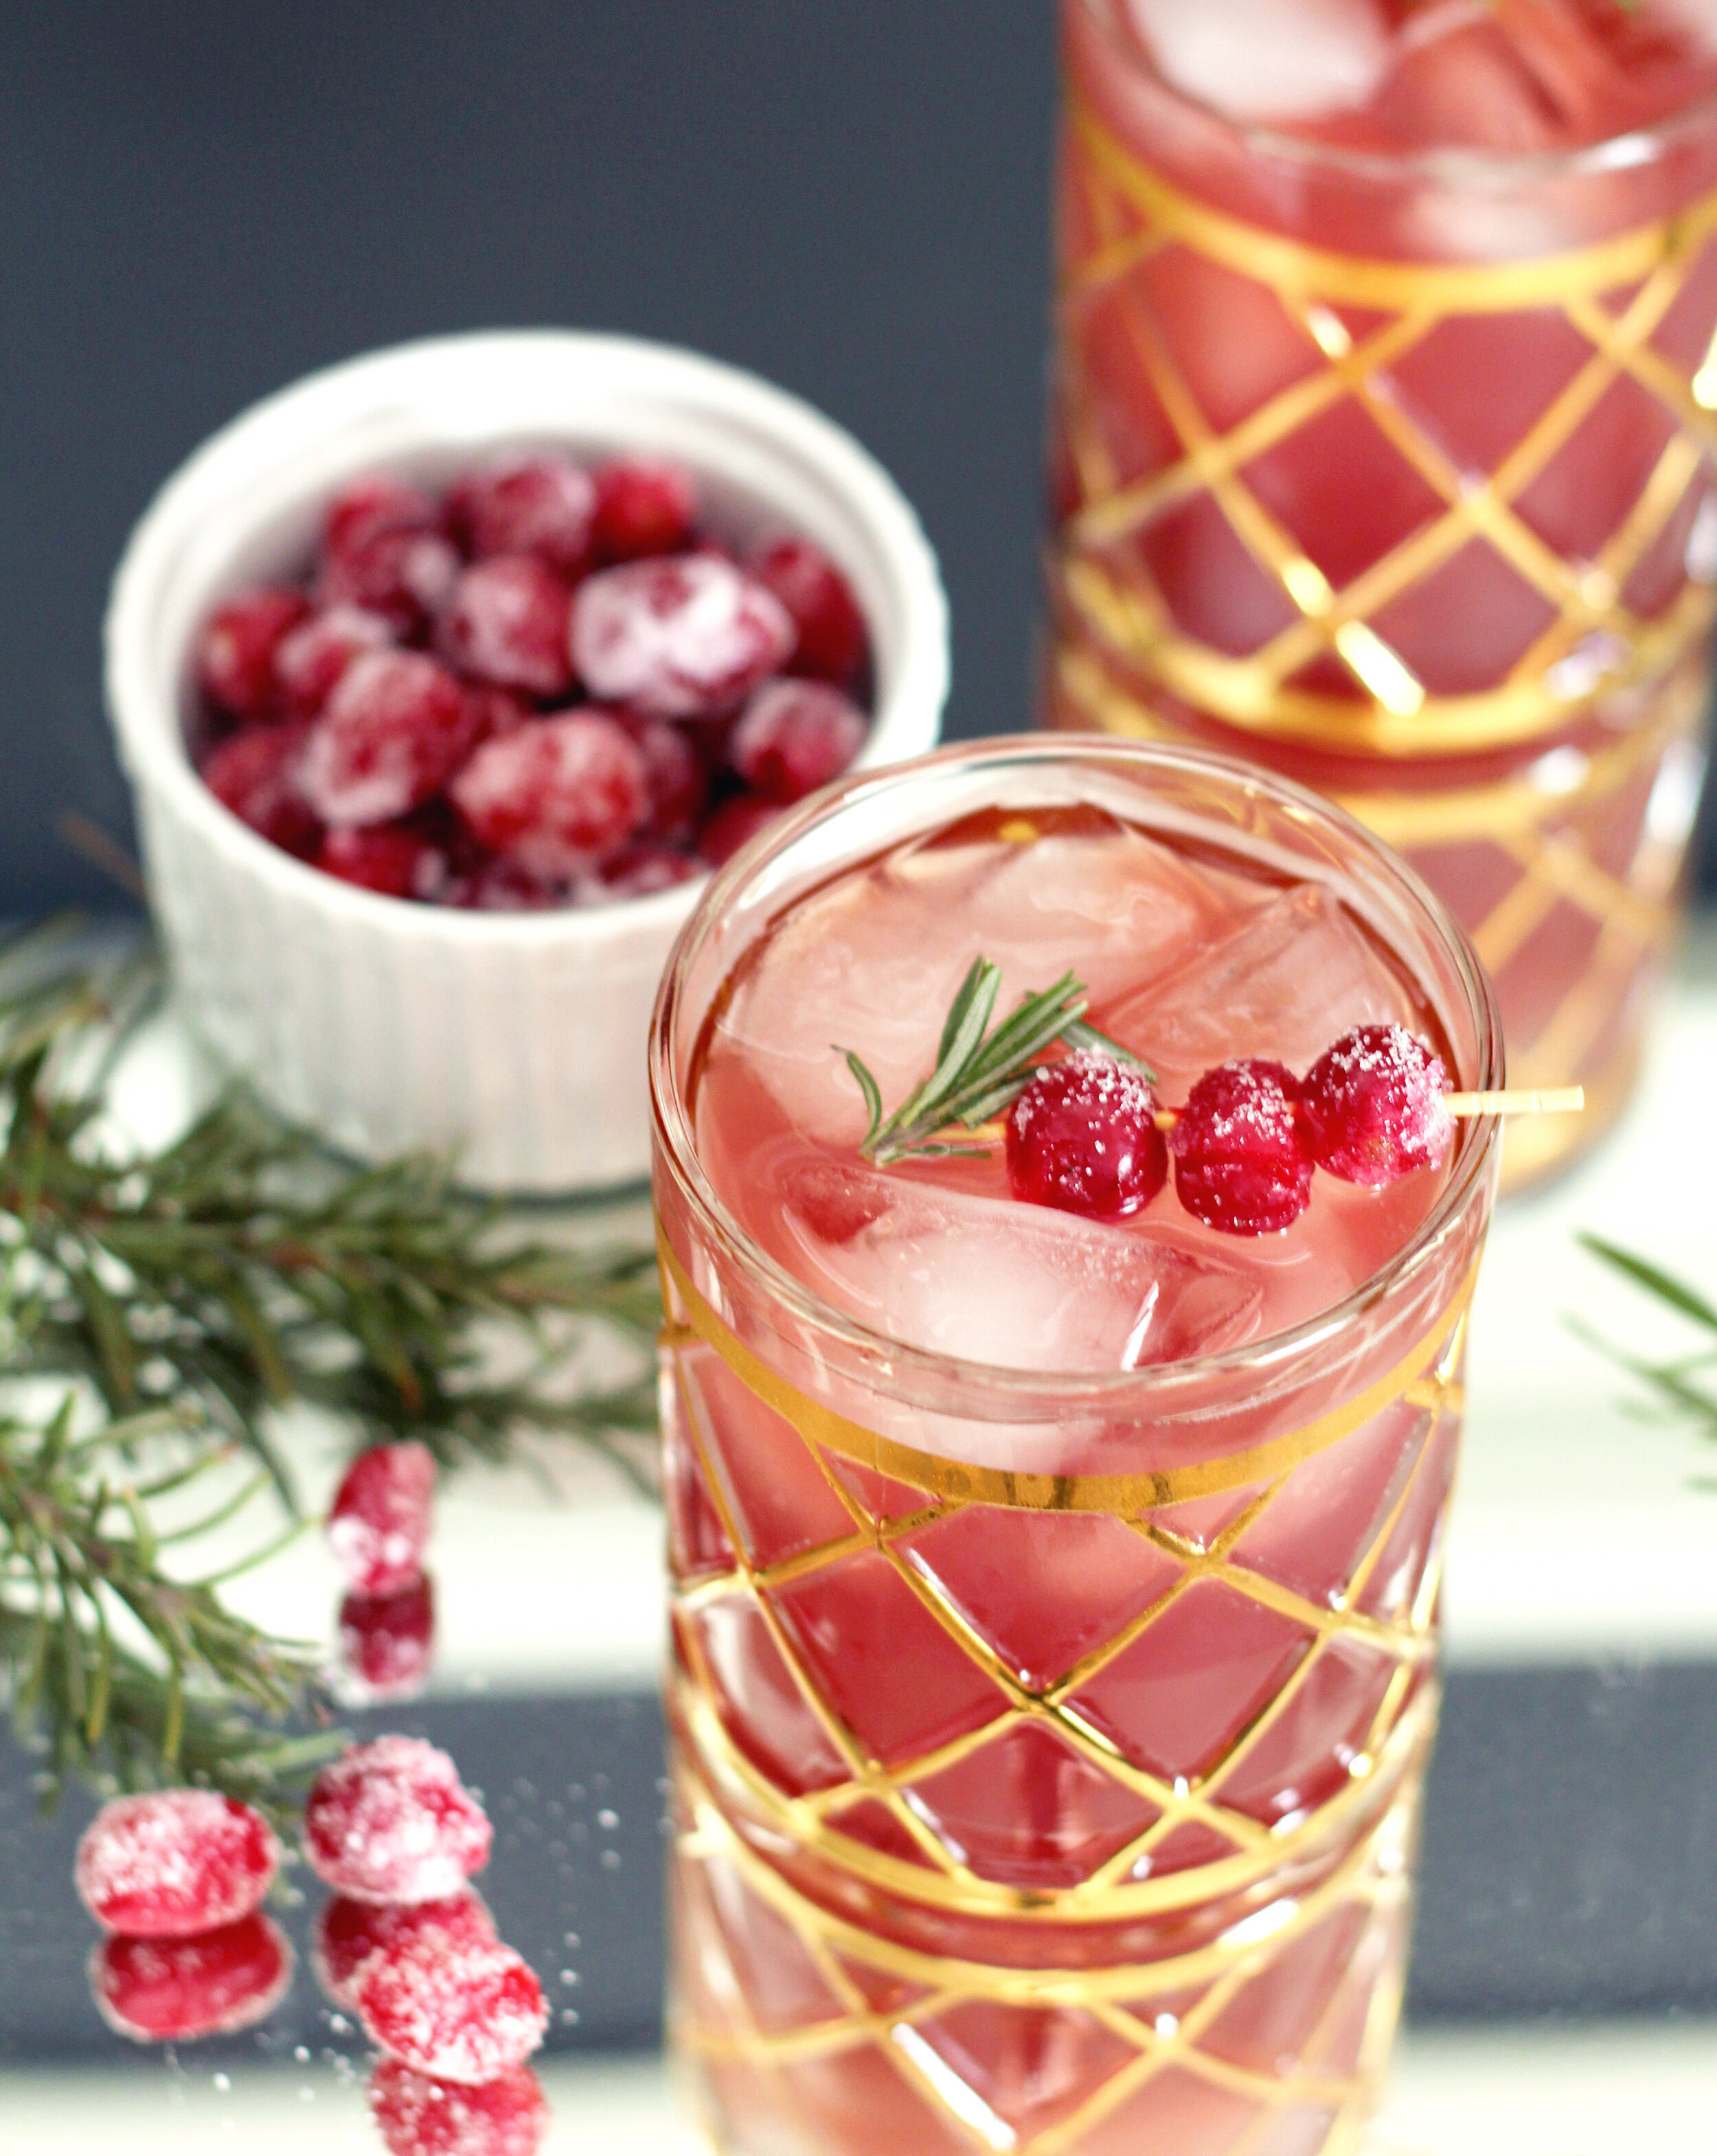
Ah, the holidays. The time of year when booze flows like water, and rightfully so. There's nothing like a little buzz to make all the family gatherings better (or you can just rely on Adele to fix everything). Luckily, I don't have any crazy relatives to dodge, so a good holiday cocktail is more of a pleasure than a remedy.
I tend to be a wine-with-dinner kind of girl, but starting off a party with a festive cocktail makes everything feel more special. This little drink has a pretty presentation that really says Christmas, and would look beautiful set up on a bar cart for a night of entertaining. I love the addition of the sugared cranberries – they look snow-covered and totally holiday ready. They are also really tasty on their own, so you can set out any extras in a little dish for people to snack on. This recipe is super easy and you can scale up the recipe depending on your number of guests (or if it's just you...ain't no shame in that game).

INGREDIENTS: (YIELDS ONE COCKTAIL)
4 oz cranberry juice
2 oz ginger ale
Splash of apple juice
1 oz gin of choice (I use Bombay)
Fresh rosemary sprigs
Sugared cranberries for garnish (recipe below)
DIRECTIONS:
Fill a cocktail shaker with ice. Pour in cranberry juice, apple juice, and gin and shake to mix. Pour into rocks glass with ice, and add your ginger ale. Garnish with a sprig of rosemary and sugared cranberries – you can place them loose into the drink, or line them up on a toothpick or cocktail pick.

SUGARED CRANBERRIES:
1 cup cranberries
1 cup water
1 1/2 cup sugar
In a small saucepan, combine cranberries, water, and 1 cup of the sugar. Heat on high until the water begins to boil, then remove from the heat. Let them stand for about 5 minutes – you want the cranberries to be whole, and not split open (a few of mine did anyway).
Once they're ready, drain the liquid and transfer the cranberries to a plate to cool for a few minutes. On another small plate, place the remaining 1/2 cup of sugar and roll the cranberries in the sugar, a few at a time. Place them on another plate or prep board to cool and dry for 10-15 minutes before inserting cocktail picks for garnish.
And that's it! You're on your way to holiday cocktail party bliss.


Recipe: Toasted S'mores Brownies

As if the leftover Halloween candy wasn't enough, I made these brownies this past weekend while craving the toasty flavor of s'mores. I love making s'mores in the summer, but there's something about this warm fall weather that's keeping me in the mood for bonfires and toasting marshmallows. This is hardly a recipe (which is why it's awesome) but it's a super tasty way to upgrade a batch of brownies.
YOU'LL NEED:
A box of brownie mix (my fave is Ghirardelli Double Chocolate, or you can make from scratch)
1/2 bag of mini marshmallows
4 graham crackers, broken into pieces
3 Hersey's chocolate bars, broken into pieces

Prepare and bake your brownies according to the instructions on the box. As soon as you remove them from the oven, sprinkle the mini marshmallows evenly on top, allowing them to warm a bit when they make contact with the brownie pan.

Turn on the broiler in your oven to the high setting.
Sprinkle the graham pieces on top of the marshmallows. Once the broiler is ready, pop the pan back into the oven (with the rack positioned a notch or two from the broiler) and allow the marshmallows to toast for about 30-60 seconds. The timing depends on the heat from the broiler – keep an eye on them to make sure the graham crackers don't start to burn. You'll want to leave the pan in until the marshmallows are golden brown and melty, so it could take longer than 60 seconds.

Remove the pan from the oven, and carefully place the chocolate pieces on top of the marshmallows. Allow the chocolate to melt a bit, and cool the brownies entirely before serving (mine usually take a few hours, my stoneware pan retains heat for a while). Cut and serve once cool. Campfire stories and plaid shirts not included ;)

Shore Society | New Look
I launched the new SS site last week and wanted to share some of the inspiration that went into the new look and branding. As any designer will tell you, designing for yourself is sort of a torturous process—you're trying to balance your vision with all of the possibilities, and nothing ever seems to be finished. You'll tweak everything over and over until you've lost the message, so knowing when to STOP noodling is key.

I began the process by collecting some inspirational images that spoke to me through texture, color, pattern and mood, and matched the aesthetic direction that felt right for Shore Society. I wanted the look to be true to the brand's nautical roots, but to avoid appearing clean and preppy – the local Cleveland influence required something a little more textured and timeworn. Something more akin to iron ore ships than sailboats and Sperrys. The overall look developed into a mix of modern and cottage, which stayed true to my own tastes as well as the existing feel of the brand.
Most of the inspiration I drew from had a limited color palette of warm black and bone ivory, with washes of gray-blue, drawn from the sea. Small doses of nude/shell peach gives a dose of femininity to such a neutral palette.
Developing the logo took the most time, by far. I went through countless ideas and revisions (should be hand lettered? Type? Clean, rough, sweet, or whimsical?) and those were all approaches I considered. In the end, I fell in love with this perfectly hand-done typeface that ticked all the boxes on my list. I expanded the design into my business cards, order insert, stickers, and packaging and hope that all of these elements create a gift-quality experience for my customers.


The "white" on all of my print pieces is actually a tint of the shale gray in my palette, to provide a warmer, scrimshaw-inspired tone.


My favorite purchase so far has to be this striped tissue paper for wrapping my shirts—it's so cute and makes me happy when I'm packing orders!
All of my printing was done by StationeryHQ and they did an awesome (and fast) job with each of the pieces. In the future I would also love to see have the business cards letterpressed. Completing the rebrand and website was a major task on this year's to-do list, and I'm so happy to check it off and move on to other things (like planning our wedding...oops). You can continue to follow the blog here, but I am hoping to move it over to shoresociety.com to keep everything in one place. Hang in there if you notice anything is missing or not working – I'm on it!
Recipe: The Perfect Carrot Cake

Well, another week has begun – I hope you guys had a great Easter! It was so nice to have Friday off, it was a much-needed long weekend and I spent the day tying up loose ends with wedding stuff and working on the new website, which is coming soon! On Easter Sunday we had a little brunch at our house, just the two of us, then visited family for dinner. One of my favorite cakes EVER is carrot cake, so it felt appropriate to bring along for the Easter Bunny feast.
I prefer nuts and raisins in my carrot cake, but I left them out in case those weren't crowd pleasers. The cake was still awesome and didn't feel lacking, so it's just personal preference! I've adapted this from various recipes, and this is what works for me. I hope you try it and enjoy...it's delicious!

THE CAKE:
1 1/2 cups vegetable or canola oil
1 cup granulated sugar
1 cup brown sugar
6 eggs
1 Tbsp. vanilla extract
2 cups unbleached all-purpose flour
1 1/4 cups whole wheat flour (you can use all-purpose instead, this is just my variation)
1 Tbsp. ground cinnamon
2 tsp. baking soda
1 tsp. salt
1 tsp. baking powder
1/2 tsp. ground nutmeg
1/4 tsp. ground cloves
1 lb. finely-grated fresh carrots
1 cup chopped walnuts (optional but YES)
1/2 cup golden raisins (optional but also YES)
THE CREAM CHEESE FROSTING:
3 8-oz. packages cream cheese, softened
2 sticks unsalted butter, softened
1 Tbsp. clear vanilla extract (regular will yield more ivory frosting)
6 cups powdered sugar
DIRECTIONS:
Preheat oven to 350°F. In a large bowl, combine flour and dry ingredients (spices, baking powder, baking soda, salt) and set aside.
Mix oil, brown sugar and granulated sugar in the bowl of a stand mixer until smooth. Add eggs and vanilla slowly and continue mixing. Gradually add the dry ingredients and beat on medium speed until combined.
Fold carrots into batter with a spatula just until combined, then add in nuts and raisins. Be careful not to over work the batter, just fold until combined.
Grease and flour two 9" cake pans, and pour batter evenly between the two. Bake for 35 minutes or until a toothpick comes out clean from the center. Place pans on a wire rack and cool completely – this usually takes a couple hours, so now's the time to make your frosting. Before I frost the cake, though, I like to pop it in the fridge to chill down – a cold cake will be much easier to frost.
TO MAKE THE FROSTING:
In your stand mixer, beat together the cream cheese and butter until smooth. Mix in the vanilla extract. Slowly add the powdered sugar one cup at a time, adding or subtracting based on desired thickness. You can add milk to thin the frosting, or add more powdered sugar to thicken it up.
TO ASSEMBLE THE CAKE:
Carefully run a table knife between the cake and the pan to loosen the cake, then flip the pans upside down to release the cake. Using a sharp serrated bread knife, level off the rounded tops of the cake layers. Place your first layer on the plate or cake stand, followed with a big dollop of frosting in the center. Spread the frosting thickly and evenly across the layer – don't worry about it being perfectly smooth, just try to get it even. Spread from the middle of the layer out to the edges and slightly down the side.
Add your second layer, centered on top of the first. Repeat the frosting process by starting with a large dollop on the top and work your way down the sides, filling and smoothing with an offset spatula.
Check out this helpful video with instructions on how to achieve a smooth finish with your frosting. Carrot cake doesn't demand a lot of embellishment with the icing, so I made a few calligraphy flags to jazz up the cake for the holiday.
You can serve the cake right away or pop it in the fridge to cool down and set, which I like to do with cream cheese frosting. You'll want to store your cake in the fridge when you're not devouring it. And that's it! Pure carrot bliss.
