
What Scares You?


iPhoneography: 5 Favorite Photo Apps
It's no secret: I love me some Instagram. It's perfect for sharing those memorable moments when the closest camera is our trusty iPhone. I also love following my favorite bloggers, musicians, and style icons to get a sneak peek into their everyday lives. It all feels very off-the-cuff and exclusive, and it's fun to see everyday shots you would otherwise never see.
When if comes to sharing my own photos, the only beef I have with Instagram is that the filters are terrible.
There are really no other tools (besides the tilt-shift and "enhance" buttons) to help you make any adjustments, so you're left to do a little pre-work before. Now, I know what you're all thinking—this is supposed to be "instant" and of-the-moment, and you shouldn't overthink this. And for most of us, you're totally right. You can put up your photo with no filter, or filter it...who cares. But there is a camp of visually-obsessive people out there who want to give a good shot the attention it deserves, so this post is for you.
This is especially true if you're a blogger, creative professional, or business owner who relies on social media to establish a brand or grow your network. It's true that image is {almost} everything.
In my opinion, the extra steps are totally worth the result and don't take much time. And the editing apps are great for more than sharing purposes—if you ever send your photos to print directly from your phone, these will add the final touches.
There are hundreds of iPhone photo editing apps out there, but these are five of my favorite and most-used (and range from free to $1.99).
AFTERLIGHT ($0.99)
Useful features:
- Can adjust brightness, exposure, contrast, temperature, highlight/shadow color, and more in great detail. This is probably my most commonly used photo editing tool, because of its versatility and range of functions.
- Nice built-in filters, which are all adjustable
- Crop, rotate, add borders

The bottom panel contains the master navigation, and the buttons on top are your options within that set. Shown here are the slider adjustments for brightness, exposure, contrast, etc.

VSCO CAM (free)
Useful features:
- Can adjust brightness, exposure, contrast, temperature with simple interface
- Limited (but nice) built-in filters, which are all adjustable
- Crop + rotate tools

A glimpse at the filters—there are only 8 or so, but they keep the interface simple.

A slider bar allows you to control how strong you'd like the filter to be.

Simple adjustment options: brightness, temperature, contrast, rotate and crop.
CAMERA+ ($1.99)
Useful features:
- A collection photo-enhancing presets that provide a more natural look than standard filters—these are great for when you already have a great shot, and want to preserve the color or other elements of your photo.
- Wide range of filters and effects, if you're looking for a more highly-edited look
- Crop, rotate, add borders
- Adjustable self-timer—clutch!

PIC FX ($1.99)
Useful features:
- Wide range of filters and effects—including textures, light filters, and bokeh arranged in "album" sets to keep things organized
- Crop, rotate, add borders
- Can layer multiple effects on top of each other


PICLAY ($0.99)
Useful features:
- This app is funky and gives a highly-edited output. It has two basic functions: Overlay and Mirror. Mirror is self-explanatory; Overlay allows you to select two photos to make a composite shot. The two layers are adjustable, and you can apply effects to change the look of the overlay.
- Can layer pre-set light effects and textures over your image

Mirror Mode:
You can use this bottom row of buttons to add different types of lighting and texture enhancements.

Overlay Mode: Adjust the look of your overlay with a few pre-set filters.
There are a few other photo apps that I use sparingly, but these are my favorites. Do you guys pre-edit your photos before Instagramming? What apps do you like?
DIY: Prada Marfa Sign
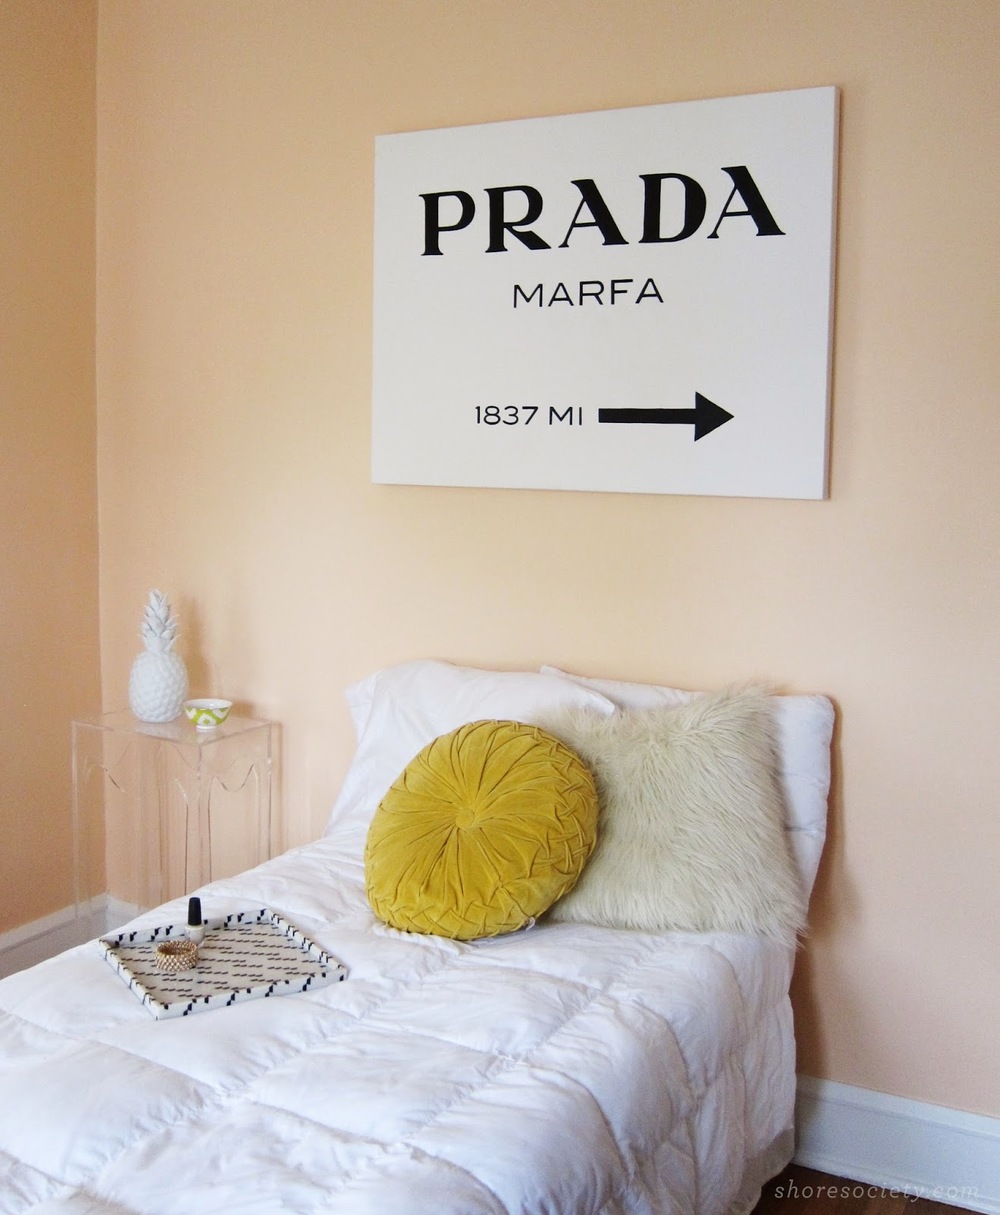
When it comes to Gossip Girl, I am not embarrassed to admit that I know a bit too much about the show, and anyone who's a fan knows about the top-notch art collection shown in GG's various Upper East-side apartments.
One of the set's most recognizable pieces is an illuminated sign by Elmgreen and Dragset, meant to serve as a road sign for the pair's famous art installation – a non-functioning faux Prada store about 60km outside of Marfa, Texas. It serves as a perfectly chic backdrop to the stylish characters and money-drenched drama—it's always somewhere in the scene. It's black+white and gorgeous, so clearly, I wanted it in our peachy-glam guest room.
As an art enthusiast lacking an art collector's budget, my only options to own this iconic piece were to either purchase a canvas version here, or make my own. You all know I like a challenge, so off to the drawing board I went. This looks a lot harder than it was (although it takes a steady hand) so here's a step-by-step plan if you're interested in making your own.
WHAT YOU'LL NEED:
Pre-stretched art canvas - I went with 30x40" for the full large-scale effect, like the original.
Black acrylic paint + brushes
Black permanent marker
Printer
Adobe Photoshop or image editing software
X-acto knife and cutting mat
Ruler
Easily removable tape (painter's or washi tape will do)

1. Start by creating the template for the design. To do this, I used an image of the artwork online, and imported it into Photoshop. I created a new Photoshop file in the size of the canvas (30x40") and imported the image as a layer in that file. I played with the scale of the art until the size looked correct, and printed the giant image out by tiling it onto regular letter-sized sheets of paper. Each printer is different, so I can't exactly walk you through how to do this, but Google can be helpful if you're not sure. Since you'll be scaling up a low-res web image, the letters will be pixellated, but you can cut away that fuzzy pixel halo when you trim the letters out.
2. To make the stencils, you'll carefully cut out each number and letter. I found that it made the most sense to cut the larger characters out ("Prada" and the arrow) and the smaller characters away from the sheet of paper, keeping them together like a stencil. This way, they're easier to trace and you won't have to worry about aligning each letter on the baseline, as they're already aligned for you.
3. Use a ruler to figure out the placement of the stencils on the canvas. I recommend having an image of the actual art pulled up on your computer, or printed out, so you can reference the linespacing. It won't necessarily be mathematically even, you just want it to look right. Double-check all of your measurements to be sure nothing is slanting up or down—the type is the hero here, and anything "off" will become pretty obvious once you paint. When you're sure, carefully tape everything down.
4. Now, trace everything. Use a pencil and be very, very gentle. It's difficult to erase pencil off of canvas, and you'll only need a ghost of a line to guide you during the painting process.

5. Once you've outlined everything, remove the stencils and tape and double check that everything looks correct before you begin to paint. I suggest taking a look from a distance – prop the canvas up against a wall and see how it looks from there.

6. Finally, you'll paint in the letters. You can make it easier on yourself by outlining the letters with a marker first, to get crisper edges. You'll probably need a few coats of paint to get everything looking solid. It's actually better to have your paint thinned down a bit with water or acrylic medium, because it will make the paint glide more smoothly across those detailed curves. Just keep layering the paint on, allowing it to dry between coats. Acrylic dries very quickly—by the time I finished one application, the first letter I did was ready for a recoat.

Easy as that! I feel like Lily Van Der Woodsen already. We're still working on finishing up the guest room, but this is starting to pull it all together. Let me know if you decide to give it a try!
Black & White

So sometimes, the mind needs a break. Black and white provides a duality that few combinations can produce: a sense of simplicity and peace while conversely shouting for attention. The contrast is stimulating; the minimalism restful. I love it as the single statement in a room, or as a graphic addition to an already colorful space.
I'm absolutely obsessed with this graphite loveseat – the pencil-drawn lines are a less graphic take on black and white – it would look so cool in a gleaming white office!
I recently did a DIY of the Prada Marfa canvas shown here, so I'll be posting that soon – likely next week. It came out so well and cost a fraction of the price – win/win. Can't wait to share it!
DIY: Distressed Wood Wall Art
This little project is probably topping my list of easiest DIY ever.
I've seen a lot of cute distressed wood cut-outs in decor shops and online sales like One Kings Lane, but knew it would be just as easy to make my own and have it exactly how I wanted it. We had a bit of a dead space in out bathroom above the towel bar, and since we already have art and floating shelves on the other wall, I needed something different. With our bathroom decor feeling like a cloudy day at the beach (the only way I can describe it), I knew a little wood whale would be perfect.

I purchased the cut-out whale from Nana's Little Nest on Etsy – it was a pre-cut item but Cindy also does custom work, so you can get exactly what you're looking for. The rest of the DIY is almost too easy.

Once you have your cut-out, you'll paint it whichever color you want (I used acrylic paint). Since we wanted ours to be white with the natural wood showing through in the distressing, we just painted it white, but if you want to do a two-color look, you'll paint the first layer one color, and the second layer your most dominant color. You'll basically just be lightly sanding away the top coat to reveal what's underneath.
Your paint doesn't need to be perfect – as you can see in the photo, I didn't even paint it solid white – but you do want to follow the grain of the wood. Let it dry overnight before sanding it.
Use a few different sizes of sandpaper to gently sand away sections of the surface. Again, follow the grain. I started with a fine sandpaper, then roughed up some areas more with a higher grit to really bring the wood through. I also sanded the paint off the edges for a bit more wear and tear, as shown below:

After it's finished, you can mount it to the wall using double-sided mounting tape. We had some cork furniture pads laying around, so we used those to give a little more dimension, and keep it from looking flat on the wall.

The entire project cost about $5, no joke. Now I'm debating another one...just have to figure out where to put it! It perfectly solves for the awkward space on the wall, when you don't want to just throw up more pictures in frames. How do you typically solve wall decor challenges?
Recipe: Funfetti Birthday Cake Cookies

There are few things I like more than birthdays and cookies. And since my favorite dessert (cookies) usually take a backseat to my other buddy (cake) on birthdays, I was extra thrilled when I could find a way to bring the cookie back to the party.
When I spotted this recipe over on Sally's Baking Addiction I knew it was L-O-V-E. These are perfectly colorful, chocolatey, and packed with cake batter flavor. She has tweaked and tweaked this recipe to make the perfect pillowy-soft cookie, so I'll lay it all out for you so that these babies can get into your mouth ASAP.

I N G R E D I E N T S :
1 1/4 c all-purpose flour
1 1/4 c yellow or white boxed cake mix
1/2 tsp baking soda
1.5 sticks softened butter
1/2 c white sugar
1/2 c brown sugar
1 egg
1.5 tsp vanilla
1/2 c white chocolate chips
1/2 c semi sweet chocolate chips
1/2 c sprinkles
D I R E C T I O N S :
1) Sift flour, cake mix, and baking soda together in large bowl.
2) In a stand mixer (or separate bowl), cream together butter and sugars. Add in egg and vanilla and mix to combine.
3) Slowly add in dry ingredients to mixer; mix only to combine. You don't ever want to over-mix your batter at this point! Use a spatula to fold in the chocolate chips and sprinkles. Let your dough chill for at least an hour before baking.
4) Preheat oven to 350ºF. Roll dough into tall balls (trick from Sally) - this will keep your cookies from spreading too much. Bake for 10-12 minutes - mine took 13 because I use insulated cookie sheets. You'll want the edges to be golden brown but the centers will still look slightly underdone — never fear, they will settle as they cool. This will keep them chewy and soft!
5) Cool and serve with some milk. And maybe a slice of cake.

These are definitely in the running to replace my next birthday cake. Enjoy!
Maine Getaway
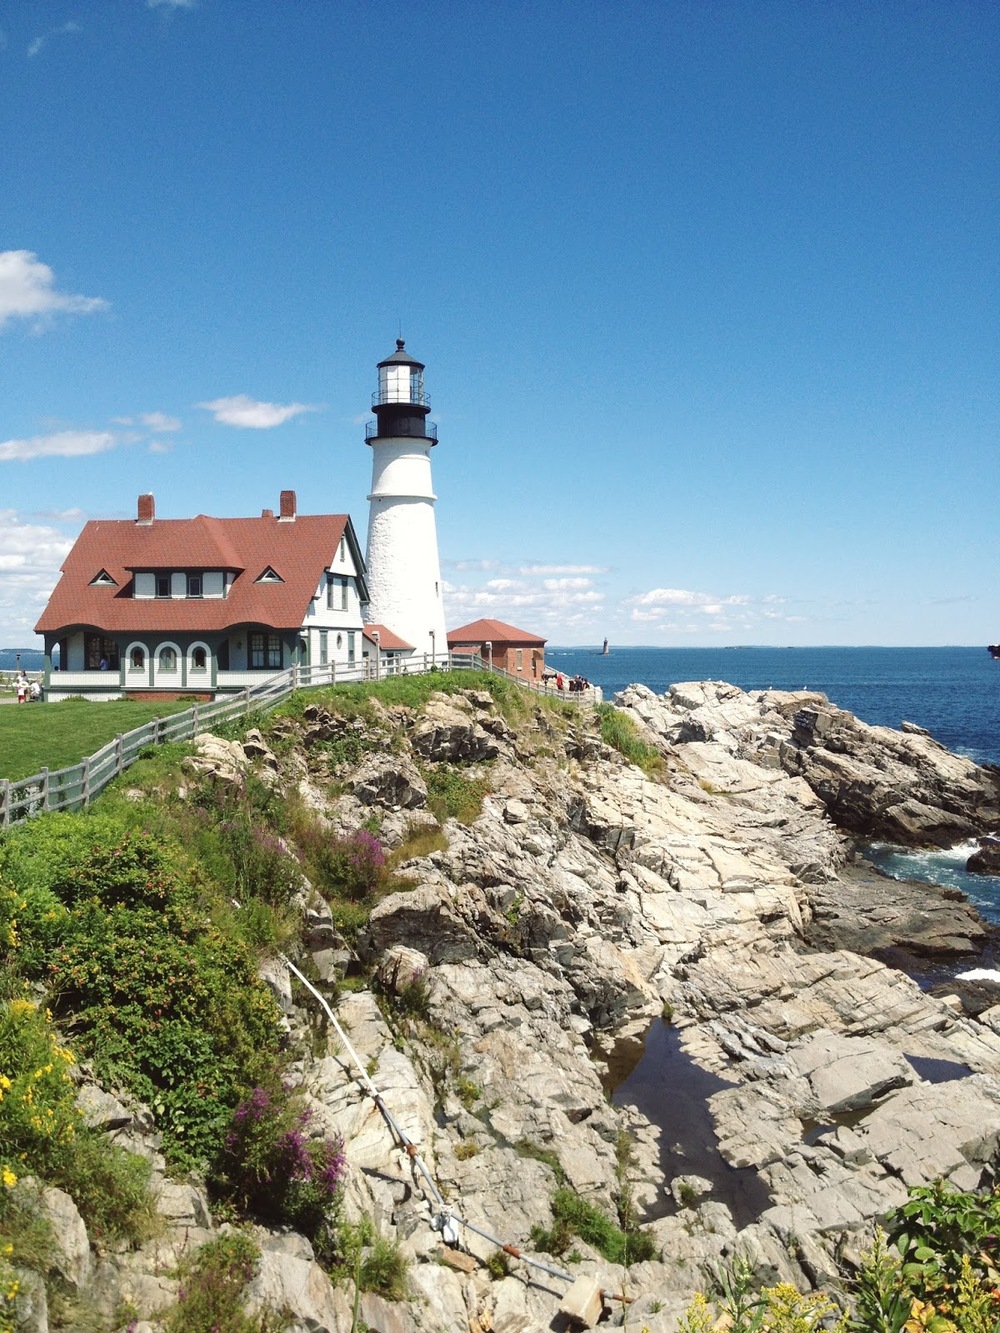


Maine was charming, beautiful, and totally delicious. I would go back in a heartbeat. We really loved Kennebunkport—although it was definitely a popular vacation spot, it was much less crowded than Ogunquit and felt a little smaller and more charming. Although many of the shops are pretty knick-knacky, there were a few that we absolutely loved—Daytrip Society and Spaces—that reminded us a lot of Cleveland's Room Service and the former Dredger's Union. We spent most of our days at the beach or biking around town, and most of our night walking up and down the beach with a bottle of wine. It was so relaxing and I miss the ocean already.
Thanks for hanging in there while I was gone (and tolerating all of my Instagram photos). It was so nice to enjoy summer while it's still here. How do you plan to spend the last weeks of summer?
Vacation Time + Giveaway Winners

#21 Charity H.
#48 Abby L.
Please email novak.rachael@gmail.com to claim your prize! First one to email gets their first choice of color (pink/green or teal/coral). Please include your mailing address, and I'll have these shipped out to you as soon as I get home. Thank you all so much for participating! I'll be back next week with updates from our trip. Have a great weekend!
Nauti Giveaway: Bait Bag Clutch by Alaina Marie
It's the start of a new week, and I'm a bit more excited than usual — we're taking off for our trip to Maine this week! Ever since we booked the trip I've been daydreaming about whale watching, riding Vespas, and eating enough lobster to require an elastic waistband. You know it's serious business when you pack a bag of cornstarch in your luggage—to remove butter stains. I wish I was kidding.

Since I can't pack you all in my suitcase, I'm bringing the Maine love to you today, with an awesome giveaway from Alaina Marie. Alaina is based in Portland, Maine, and hand crafts these bright and adorable clutches inspired by lobster bait bags.

The marine-grade materials make the bag splash-proof for those days on the boat or at the beach, and she hand-silkscreens the patterns on the bags. I absolutely adore their subtle nautical charm, and the workmanship is beautiful. They make the perfect companion for the summer, and you better believe I'll be taking mine along on our trip!

The giveaway begins now, and runs until Thursday, 8/8 at 11:59 pm. To enter, you can do one or many of the following - each item counts for one entry. Leave a comment below with what entries you've completed. Two winners will be randomly drawn to receive one clutch each (pictured, one pink/green and one teal/coral, valued at $58). Winners will be announced here on Friday 8/9 at 9:00 am. Choice between colors is first come, first serve when the prizes are claimed.
Each item counts for one entry:
1) Follow Shore Society on Twitter or Facebook
2) Follow Alaina Marie on Facebook
3) Share this giveaway on Facebook or Twitter, using the tags #mainelovegiveaway and @shoresociety
4) Leave a comment telling us whether or not you like lobster, and if so, what's your favorite dish?
Thanks for entering - good luck!
*Disclosure - I was provided with three clutches by Alaina Marie, with two to give away. All opinions are my own, as always!
Recipe: Summer Cherry Pie

There's a history to my love of pie-making. Ready for a quick story?
My second year of college, I was working as an Intern at an agency in Cleveland that frequently had cook-offs, bake-offs, and contests. That summer, they were having a pie-baking contest and even though I was the intern, I wasn't off the hook. I had never baked a pie before in my life and thought I was in for some tough competition, so I chose an unconventional pie recipe to make up for inexperience — a gingerbread linzertorte with raspberry filling. Looking back at this recipe, this is obviously a holiday pie and I probably shouldn't have made one in the middle of the summer {remember this, college kids: you are not at your intellectual peak}! I made a practice pie, messed it up, and made another one. The second one looked great, and everyone loved it at the tasting. I ended up winning the contest, and it was love at first pie.
We got a huge haul of local cherries in our Fresh Fork bag last week, and they were a bit sour for casual eating, which makes them perfect for baking. I made this cherry pie after scouring the internet for the right recipe, and I think I've found the perfect one. A little touch of almond extract enhances the filling, while boiling the cherries with sugar creates that gooey filling I was going after. It was pretty easy, not too time consuming, and {most importantly} tasted great!
I didn't have a pitter, so we followed the toothpick method to pit the cherries—but I've also heard that a paperclip or bobby pin work well. So interesting!
What's your favorite type of pie? Fruit? Pecan? Pumpkin...! I'm thinking about pumpkin pie without trying to rush into fall—but I can't help myself!